

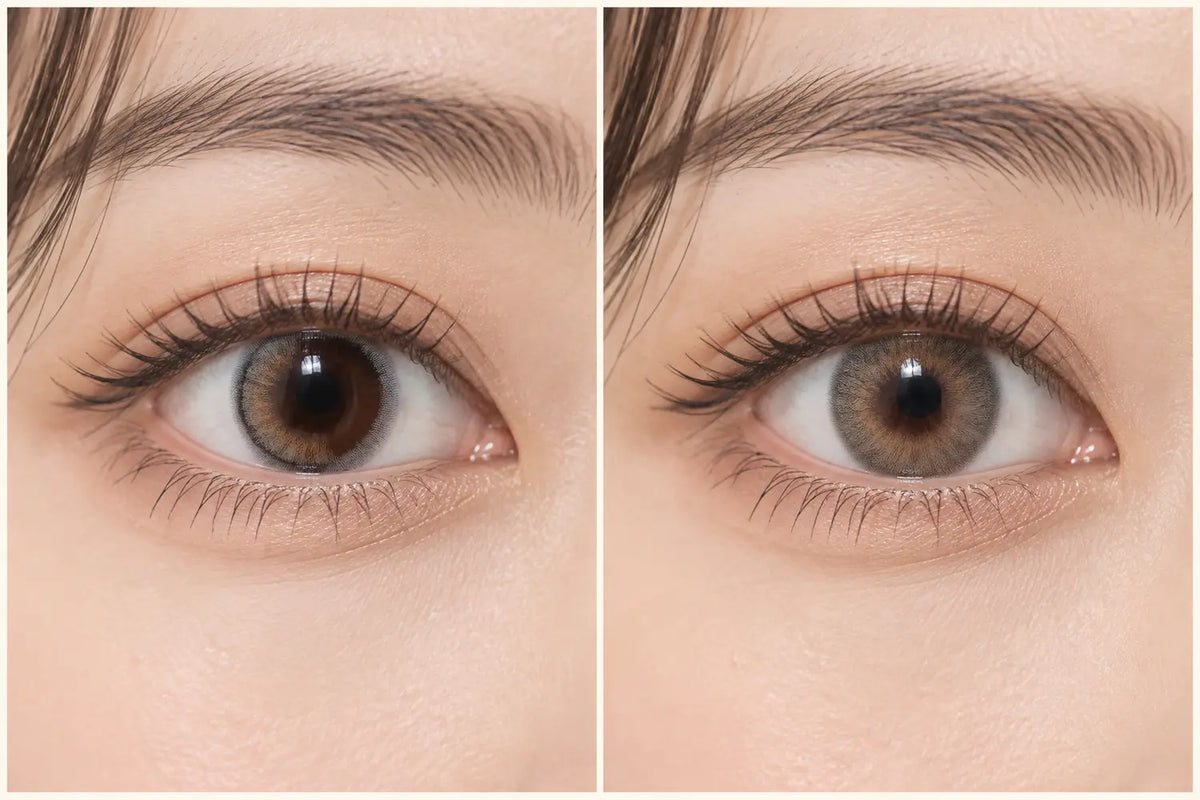
If a colored contact covers the edge of a dark iris but not the center, compare the pupil-zone blend before judging the graphic diameter. The outer ring may add definition while a wide, transparent or lightly printed center lets the natural dark iris dominate. Review close-up and face-level photos in consistent lighting, then compare center opacity, gradient width, outer-ring strength and the model’s starting eye color.

Read the Pattern as Two Visual Zones
The printed outer area and the transition around the pupil do different jobs. A dark or dense outer ring can make the iris boundary look clearer. The inner print determines whether the chosen shade continues toward the pupil or fades early and reveals more of the natural iris.
That means “good edge coverage” does not guarantee an even color change across the iris. On very dark eyes, a sheer center may remain brown or nearly black while the perimeter appears gray, green or lighter brown. This can look intentionally dimensional, or it can create more center contrast than the shopper wanted.
Compare the Pupil-Zone Gradient, Not Just the Shade Name
Look for a gradual field of small dots or fine strokes leading toward the clear pupil opening. A broad, soft gradient usually mixes the printed color with the natural iris. An abrupt boundary between a pale print and a dark center can appear sharper, especially in bright light when the pupil becomes smaller and more of the inner iris is visible.
Shade names do not reveal this structure. Two “gray” lenses may use different center opacity, print density and ring strength. The one with the wider blend may look more integrated even if its listed graphic diameter is not larger.
Graphic Diameter Cannot Explain Center Coverage Alone
Graphic diameter describes the overall printed span, but it does not tell you how that print is distributed. A larger graphic can still have a wide transparent center. A smaller graphic can carry a denser gradient closer to the pupil. Use the measurement to estimate apparent scale only after inspecting the actual pattern.
| Feature | What it helps explain |
|---|---|
| Outer ring | Definition at the iris edge |
| Center opacity | How strongly the color competes with a dark iris |
| Gradient width | How smoothly print transitions toward the pupil |
| Graphic diameter | Overall printed span, not inner distribution |
Use Three Photo Views for a Fair Check
Start with a lens-only macro image to see the print layout. Next, use a straight-on eye close-up to inspect the pupil transition and edge. Finally, use a face-level image to decide whether the center contrast remains noticeable at normal viewing distance. Compare indoor and daylight images when available, but avoid treating exposure or editing as proof of a guaranteed result.
Give the most weight to photos from wearers whose starting iris color resembles yours. Even equally dark eyes can differ in undertone, visible texture and pupil size, so results remain individual.
A Fast Shortlist Method
- Choose the amount of edge definition you want.
- Reject patterns with a center transition that looks too abrupt for your goal.
- Compare close-up and face-level images on similar starting eyes.
- Use graphic diameter to refine apparent size, not to predict center opacity.
- Confirm the exact prescribed power and required specifications before ordering.
Frequently Asked Questions
Does a larger graphic diameter cover more of the center?
Not necessarily. It describes the total printed span, while the inner print distribution can still be transparent or lightly pigmented.
Why does my natural eye color remain visible near the pupil?
The lens may use a clear pupil opening and a soft or wide inner gradient that allows the natural iris to show through.
Is a visible dark center always a bad result?
No. Some shoppers prefer the depth it creates. The question is whether the transition suits the intended natural or defined look.
Why can the center look harsher outdoors?
Brighter light can change pupil size and increase visible contrast, while camera exposure also changes how the transition appears.
Which product image is most useful?
A lens-pattern macro, a straight-on close-up and a face-level image together provide a stronger comparison than any single view.
Can photos guarantee the same result on my eyes?
No. Starting iris color, pattern, pupil size, lighting and image processing can all change the appearance.
Related categories: Colored Contacts for Dark Eyes · No Black Rim · Enlarging Contacts · Gray Contacts · Brown Contacts


